Looking for more help or documentation? Please visitor our new knowledge base here:
https://themovation.helpscoutdocs.com/
If you are still having issues, please let us know, we can help. https://themovation.ticksy.com")
Looking for more help or documentation? Please visitor our new knowledge base here:
https://themovation.helpscoutdocs.com/
If you are still having issues, please let us know, we can help. https://themovation.ticksy.com
We have created a website to help you get started with Bellevue, the Hotel + Bed and Breakfast WordPress Theme. Check it out here: https://themovation.helpscoutdocs.com/category/225-hotel-booking
Are you using Stratus V2? Not sure? Please see important update instructions for Stratus here.
Are you using Bellevue V1? Not sure? Please see important update instructions for Bellevue here.
Are you using Entrepreneur V1? Not sure? Please see important update instructions for Entrepreneur here.
For Embark (All versions), Stratus (V3), Bellevue (V2), Entrepreneur (V2), Pursuit (V2), please use the auto update plugin included with the theme setup.
For Eatery:
The latest versions of our themes can be download any time from your ThemeForest download page.
First of all we recommend making a backup of your files and database when updating the theme, just in case even though it should go over smoothly.
If you have made any modifications to the core theme files without using the included child theme then you’ll need to make note of the changes, and in that case we would definitely recommend making a backup. A program like WinMerge (Windows) or DiffMerge (Cross platform) can also be very helpful in that situation. For theme file changes, we always recommend using the included child theme instead of editing the main/parent theme itself.
If you haven’t made any core theme file changes, the best way to update the theme would be to extract the download package and overwrite the (parent) theme folder over FTP.
If you’re not familiar with FTP, then you can just go into the WP dashboard and delete the (parent) theme, then install the newly downloaded version of the theme as you normally would (note that you’ll have to switch the theme before deleting it if you are not using a child theme, since WP doesn’t allow you to delete the active theme.) Since your content and settings are stored in the database, you won’t be deleting that content.
If you have any questions, feel free to open a support ticket.
To add WooCommerce to a booking calendar you'll need to include the product ID as part of the shortcode. Here is a snippet from our documentation (scroll down to the heading 'WP Booking System'):
wooproductid="458"
and replace the ID (or 458) with the ID of your new product (https://cl.ly/233d0j1m3D0C)
Your shortcode should look something like this:
[wpbs id="1" form="1" title="no" legend="yes" start="1" display="3" language="auto" history="1" tooltip="1" month="0" year="0" selection="multiple" autopending="yes" weeknumbers="no" wooproductid="458"]
Save changes and view your page.
REF: https://docs.woothemes.com/document/configuring-woocommerce-settings/
Cheers!
Sometimes you may want to display the rooms price and info for mobile or touch as these devices do not have a hover state. Here is some custom css to help you customize.
@media (max-width:767px){
.room-center{
    opacity: 1;
}
.room-overlay{
    opacity: 1;
    background-color:rgba(0, 0, 0, 0.3);
    }
}
or if you wanted the price / description on at all times you can leave out the @media query..
.room-center{
    opacity: 1;
}
.room-overlay{
    opacity: 1;
    background-color:rgba(0, 0, 0, 0.3);
    }
Try adjusting the background-color to whatever you wish, we made black for this example.
or this example to have text on at all times, with no background tint
.room-center{
    opacity: 1;
}
.room-overlay{
    opacity: 1;
    background-color:rgba(0, 0, 0, 0);
    }
Cheers!
To use minimum days required, click on the 'Add Calendar' in the content editor toolbar.
http://new.tinygrab.com/6407caa59eb3dbbea3f902284c7bded77fc2280a5e.png
then choose 'minimum days' from the modal window.
http://new.tinygrab.com/6407caa59e2c7b41350b4422016ba4345c77257f44.png
Regards
If you want to import iCal into Google Calendar, then you'll love this new feature on WP Booking System.
First you'll need to have copy of Belleuve which comes bundled with the WP Booking System. Once installed you can go to WP Dash and then:
1) Go to WP Booking System / Calendar / a Create a new Calendar
2) Go to WP Booking System / Sync and copy the iCalendar Link of the calendar you want to sync with Google Calendar.
http://new.tinygrab.com/6407caa59e6b88885bba183659e02c3b82bf8438bc.png
3) Then use the iCal link whenever it is asked by Google when importing or setting up a new iCal sync.
https://support.google.com/calendar/answer/37118?hl=en
That's it.
* WP Booking System does not sync both ways, only from WP Booking System to Google Cal or any calendar that supports iCal. Syncing from iCal into WP Booking System is something that will be added in a future release.
There is a theme option setting to customize the permalink (aka url, slug) for the rooms custom post type.
1) go to theme options / rooms / and change the "Rooms Custom Slug" like so:
http://new.tinygrab.com/6407caa59e22d9244af26c574f4f69a1320ab7f3a9.png
then save changes.
2) Go to Settings / permalinks (just go to the page, don't make any changes) this resets the permalink structure.
http://new.tinygrab.com/6407caa59e33f224ab043f3a2381e29377c17e2fba.png
3) Test
what used to be: mysite.com/rooms/tofino/
(http://new.tinygrab.com/6407caa59e80040453e9a47b40e95c9cbc75aa7856.png)
now looks like: mysite.com/chambres/tofino/
(http://new.tinygrab.com/6407caa59ee4ba819b8b97a99051ea4b632c7751cc.png)
Cheers!
To show 2 rooms. Put this under Appearance / Theme Options / General / Custom CSS
@media screen and (min-width:992px) {
   .rooms-row {
       width:auto;
       max-width:760px;
       margin-left:auto !important;
       margin-right:auto !important;
   }
   .rooms-row .item {width:380px !important;}
}
To target just one specific meta box, try putting the meta box ID in front of it. You can also add in a custom anchor ID and use that too.
Example: Let's say you just wanted to target the first rooms meta box.
@media screen and (min-width:992px) {
   #themo_rooms_1 .rooms-row {
       width:auto;
       max-width:760px;
       margin-left:auto !important;
       margin-right:auto !important;
   }
   #themo_rooms_1 .rooms-row .item {width:380px !important;}
}
or a Single Room
#hidethis{
    display:none;
}
@media screen and (min-width:992px) {
   .rooms-row {
       width:auto;
       max-width:380px;
       margin-left:auto !important;
       margin-right:auto !important;
   }
   .rooms-row .item {width:380px !important;}
}
Cheers!
For promoting from development to production we find tools like this one are amazing for migrating databases, then you don't have to do the find / replace bit:
http://pixelentity.com/wordpress-search-replace-domain/
Since the options builder we are using (OptionTree) stores the data as serialized it makes it much more difficult to do a simple find / replace and that's why the link above is so great. That service does have a max database size of 5mb though, so we've also found an open source tool that works similarly without the max size limitation:
https://interconnectit.com/products/search-and-replace-for-wordpress-databases/
This is something you can download locally and it supports serialized data as well.
Using a Plugin
As another option, one of our awesome customers has used and recommends the following premium tools which handle the migration from Development to Production.
Thanks Tom!
Some Bellevue users have experienced an issue where email from the WP Booking system and also Formidable is not sending. Please ensure your web host has enabled php script allowing email to be sent form the website.
Thank you Emanuel for sharing your solution with us.
You can also try adding a SMTP plugin to authenticate emails and improve deliverable rates.
We recommend.
https://wordpress.org/plugins/easy-wp-smtp
https://wordpress.org/plugins/wp-mail-smtp/
https://wordpress.org/plugins/postman-smtp/
Here is a screenshot of our settings under WP Dash / Bellevue / Sliders / Add New
Here is the live demo: http://demo.themovation.com/bellevue/chalet/
Cheers!
Version 2
Add this to your custom css under theme options / general to hide All
.th-portfolio-filters a[data-filter='*'] {
display:none;
}
Add this to your custom css under theme options / general to hide Sort
.th-portfolio-filters span {    display: none;
}
If you wanted to hide a specific filter try this:
.th-portfolio-filters a[data-filter="#themo_rooms_1 .p-vacation-rental"] {
display:none;
}
where
.p-vacation-renta
is the name of your filter.
Version 1
Add this to your custom css under theme options / general to hide All
.rooms-filters a[data-filter='*'] {
display:none;
}
Add this to your custom css under theme options / general to hide Sort
.rooms-filters span {
    display: none;
}
If you wanted to hide a specific filter try this:
.rooms-filters a[data-filter="#themo_rooms_1 .p-vacation-rental"] {
display:none;
}
where
.p-vacation-renta
is the name of your filter.
Adding and editing email notifications is managed in two areas depending on which plugin are you using.
Formidable: https://formidablepro.com/knowledgebase/email-notifications/
and WP Booking System:
http://bellevuetheme.com/2015/09/09/wp-booking-system-create-a-booking-form/
more about WP Booking System...
http://bellevuetheme.com/2015/09/09/wp-booking-system-receive-and-manage-bookings/
http://bellevuetheme.com/2015/09/09/wp-booking-system-publish-a-calendar/
http://bellevuetheme.com/2015/09/09/wp-booking-system-manage-availability/
http://bellevuetheme.com/2015/09/09/wp-booking-system-create-a-calendar/
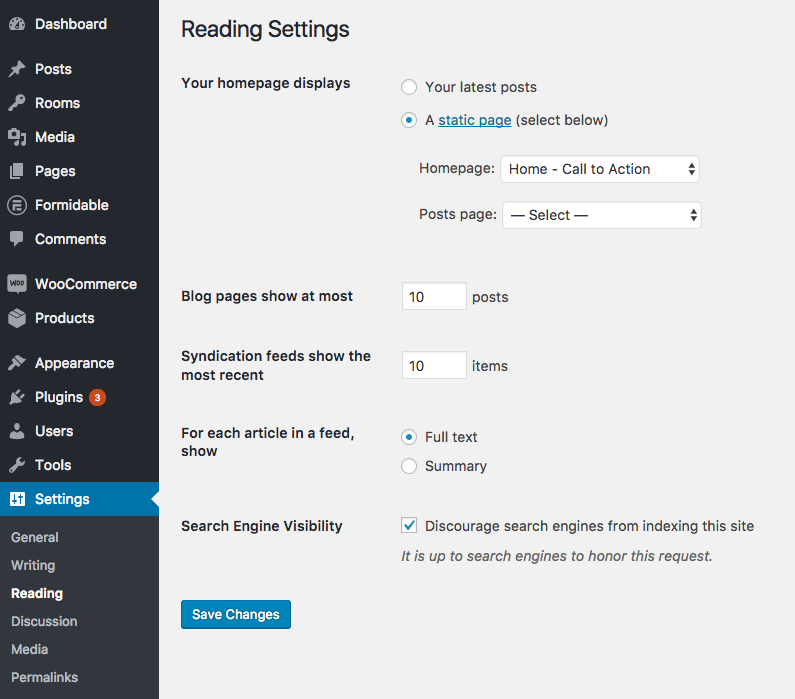
Sometimes you may want to show more than 10 rooms at once. There is an easy fix! If you go to settings / reading / and edit the show blogs at most setting, bump it from 10 to whatever you need. :)
To help you replicate the demo, please install / import the demo content you can see a video of how to do this here:
http://bellevuetheme.com/2015/09/09/wp-booking-system-manage-availability/
If you are trying to add your own custom page header background, try these settings:
http://new.tinygrab.com/6407caa59e6c55314d01725cd003d9642ecc239949.png
Taken from this page (our live demo):
http://demo.themovation.com/bellevue/hotel/explore/
Cheers! :)
What we've done is we have snapped the wp booking system into WooCommerce so that each calendar can be tied in with a product or in the case of a variable product, a sku.
You can create one product in WooCommerce and choose variable which allows you to set multiple prices for 1 product.
https://docs.woothemes.com/document/variable-product//
Once that is done you can add the sku replace of the ID like this:
wooproductsku="room_1_summer"
So altogether your shortcode would look something like this:
[wpbs id="1" form="1" title="no" legend="yes" start="1" display="3" language="auto" history="1" tooltip="1" month="0" year="0" selection="multiple" autopending="yes" weeknumbers="no" wooproductsku="room_1_summer"]
Then you create a calendar for each season and use the corresponding sku for that season rate. Something like this:
Summer Calendar:
[wpbs id="1" form="1" title="no" legend="yes" start="1" display="3" language="auto" history="1" tooltip="1" month="0" year="0" selection="multiple" autopending="yes" weeknumbers="no" wooproductsku="room_1_summer"]
Winter Calendar:
[wpbs id="2" form="1" title="no" legend="yes" start="1" display="3" language="auto" history="1" tooltip="1" month="0" year="0" selection="multiple" autopending="yes" weeknumbers="no" wooproductsku="room_1_winter"]
With the WP Booking System, you can create a calendar for each season, and then block off the dates that fall outside of that season, allowing the customer to only selected dates that fall within, coupled with the sku for that seasons rate, the calendars shortcode will add the room with the correct price.
You can also use the same calendar for both seasons, just make sure to add a unique wooproductsku to tell the calendar what pricing to use.
Setup a variable product:

Add variations

Add variation prices

Add the calendars to your page

Should look like this in text mode. Make sure to add your wooproductsku parameter.

Add second calendar (notice the Start Month for winter season, could be helpful)

and now how the shortcodes should look in text mode. Make sure to add your wooproductsku parameter.

Make sure you have specified your cart, checkout pages

update your cart behaviour

Testing...

After Book is clicked


Should be redirected to cart page.

That's it!
We wrote some help on sorting here:
http://docs.themovation.com/bellevue/#metaboxsorting
and
http://docs.themovation.com/bellevue/#draganddrop
and here is a little bit more about adding rooms.
http://bellevuetheme.com/2015/08/30/adding-the-rooms-custom-post-type-to-a-page/
The key is going to be the 'order by' setting inside the Rooms meta box.

Ensure that 'drag and drop' is selected here.
Then under WP Dash / Rooms / All Rooms, make sure 'Sort by order' has been clicked at the top.

Then you should be able to drag and drop your order.

just be clicking and dragging on the rooms.
If you are trying to use Prev / Next navigation in the Rooms page header, then you'll need to make sure that all your rooms belong to at least one group. Call it 'All' and make sure to include this group when you add your rooms to the Rooms meta box 'select by group' field.
Happy to help if you run into any issues.
If you want to adjust your image more specifically, try unchecking parallax and play around withe the background settings so that you can pick a focal point, like center center.
As an example of my page:
http://demo.themovation.com/bellevue/hotel/explore/
Here is the background settings to make the image stay crisp while centering it properly:

Actual image link (1400 x 600)

I'm viewing your site on a 1920 x 1200 monitor.
Here is a screenshot of our settings under WP Dash / Bellevue / Sliders / Add New
Here is the live demo: http://demo.themovation.com/bellevue/hotel/
Cheers!
We disable transparency for touch because of some inconsistencies with mobile menu. You can certain try it with transparency by turning this setting off for "touch" devices. It will still disable for smaller screens like iPhone.
Open bellevue/assets/js/main.js
line 263 of main.js
var isTouch = Modernizr.touch ||
should be
var isTouch = false ||
Also, go into page-header.php and change
<script>
            jQuery(document).ready(function($) {
                "use strict";
                if (Modernizr.touch) {
                    <?php echo sanitize_text_field($background_js);  ?>
                }
            });
        </script>
to
<script>
            jQuery(document).load(function($) {
                "use strict";
                if (Modernizr.touch) {
                    <?php echo sanitize_text_field($background_js);  ?>
                }
            });
        </script>
That should be it. :)
We wrote a little javascript to help customize what filter is triggered on page load.
Put this in your child theme functions file.
For version 2 +
// themo_hook_head_css = to add custom css or JS to your head
add_action('wp_head','themo_hook_head_css');
function themo_hook_head_css() {
    $output="<script>
        jQuery(window).load(function($) {
            // Change collaboration to your filter name.
            var filterby = 'collaboration';
            // DONT EDIT BEYOND THIS
            jQuery('.th-portfolio-row').isotope({
                // options
                itemSelector: '.th-portfolio-item',
                layoutMode: 'fitRows'
            });
            jQuery('.th-portfolio-row').isotope({ filter: '.p-'+filterby }); // Filter by specific class
            jQuery('a[data-filter=\"*\"]').removeClass( 'current'); // Remove All as active
            jQuery('a[data-filter=\"#portfolio_content .p-'+filterby+'\"]').addClass( 'current'); // Add active state to specific class.
        });
            </script>";
    echo $output;
}
For earlier versions:
// themo_hook_head_css = to add custom css or JS to your head
add_action('wp_head','themo_hook_head_css');
function themo_hook_head_css() {
    $output="<script>
        jQuery(document).ready(function($) {
            // Change collaboration to your filter name.
            var filterby = 'king';
            // DONT EDIT BEYOND THIS
            jQuery('.rooms-row').isotope({
                // options
                itemSelector: '.rooms-item',
                layoutMode: 'fitRows'
            });
            jQuery('.rooms-row').isotope({ filter: '.p-'+filterby }); // Filter by specific class
            jQuery('a[data-filter=\"*\"]').removeClass( 'current'); // Remove All as active
            jQuery('a[data-filter=\"#themo_rooms_1 .p-'+filterby+'\"]').addClass( 'current'); // Add active state to specific class.
        });
            </script>";
    echo $output;
}
Then change the filterby variable to the filter you wish to auto filter by on page load.
In the example above I want to auto filter on page load by the 'king' filter. You can see an example of the 'king' filter on this page although we don't have it auto filtering at this time.
http://demo.themovation.com/bellevue/hotel/#themo_rooms_1
:-)
To set auto-pending. You need tow things.
1) One of the legend statuses set to auto-pending (See star button)

2) then you'll need to set auto pending in the shortcode.

or
[wpbs id="1" form="1" title="no" legend="yes" start="1" display="3" language="auto" history="1" tooltip="1" month="0" year="0" selection="multiple" autopending="yes" weeknumbers="no" wooproductid="458"]
This is a common error are there are two zips you download from themeforest, a solution to this issue is in this article.
https://help.market.envato.com/hc/en-us/articles/202821510?_ga=1.61327468.1140640435.1445836150
I hope this helps.
There are several live demos, Urban Guest House (Yaletown), Chalet (Rustic), Countryside (Parksville), Beach House (Long Beach), Lake Cabin (Lakeshore), Hotel (Bellevue) and One Pager Style (Yaletown one pager).
The demos are virtually identical so we've combined them into one import file "demo_import.xml). The homepage and sub pages should look like like all the demos apart from the stock photos which we explain in detail below. If there is something missing that you need assistance with please let us know and we can help guide you through.
If you are looking for the home page slider that has a calendar in it, we've provided an article on how to set that up here:
Adding Calendar to Slider (Chalet Demo)
If you are looking to setup a form on the homepage like the Hotel, Beachhouse demos please see:
Adding Form to Slider (Hotel, Beachhouse Demo)
We ship the theme with placeholder images for two reasons:
We've provided placeholder images and solid colours as part of the import. We've also provided links to a dropbox folder with the photos that are part of the the creative common license. This file is located under the demo content folder in the theme zip download from Theme Forest.
Cheers!
* We can provide link to stock photos upon request so you can purchase your own copy.
We are happy to assist you with any questions or concerns, just let us know how we can help or improve our setup.
Our theme automatically disables sticky for mobile, so if you want to enable it , just make this modification and it should world on both desktop and mobile. :)
Open up bellevue/assets/js/main.js
Then edit line 901
if(!isTouch){
to
if(true){
of if you want to totally disable this for mobile try:
if(false){Make sure to use the auto pending feature so that when someone requests a stay, those dates will automatically be set to a different color to indicate that they are not available. We wrote a guide here:
Setup Auto Pending on the Bellevue Booking System
Next I would create a form to go with the calendar and ask for Name and Email and Phone, this will become your booking reference so that you can match them up with the deposit inside of WooCommerce. You can find the forms under Dashboard / WP Booking / Forms / Add New if you haven't already. Create your form. If you want notifications and or Auto Reply please set those up as well. Then you can include that form with your calendar when you add the calendar to your page. It's under the section 'Form Options'. There is a screenshot of this in the article above.
The Calendar also has an option for specifying Minimum Days. It's also included in the screenshot inside the guide above.
Then you will want to create a product in WooCommerce that will be used to price out your room and add it to the calendar shortcode. We wrote a guide on there here:
Add WooCommerce to a booking calendar
Once the visitors requests a booking, an add to cart button will appear and they can proceed to checkout.
For the second half, taking deposits, terms of service, etc, you will need to use WooCommerce as the WP Booking System plugin will pass the prices off to WooCommerce and WooCommerce handles all the payments.
Adding Terms of Service Check box Video:
As for the deposits, the plugin will take the days booked and use that as a multiplier for the quantity added to the cart. If you book 5 days, it will take the product and multiply it by 5. So if you would like to take a deposit perhaps you can reduce the $ amount on the product and then change the text that shows up on he product indicating that this is a deposit.
There are also several plugins that helps taking partial payments. Please contact the plugin author to ensure it will work the way you want it to . Here is one I found.
http://codecanyon.net/item/woocommerce-deposits-partial-payments-plugin/9249233
I think that covers your questions. Let us know how it goes and if you have any other questions for us. We are happy to help. Cheers!
.room-overlay {
    background-color: #a94442;
}
* Custom CSS can be added under Dashboard / Appearance / Theme Options / Custom CSS
Sometimes you may want to trigger the mobile menu sooner than the default screen size.
** Before you customize, please back up your files so you can roll your changes back if you need to.**
First thing is to add this custom css under theme options / general / custom css
/* Mobile Menu */


@media screen and (max-width:991px) {


    .navbar-header {float:none}


    .navbar-toggle {display:block}


    .navbar-collapse {
        border-top:1px solid transparent;
        box-shadow:inset 0 1px 0 rgba(255,255,255,0.1);
    }
    .navbar-collapse.collapse {display:none!important}


    .navbar-nav {
        float:none !important;
        margin:7.5px -15px;
    }


    .navbar-nav > li {float:none}
    .navbar-nav > li > a {
        padding-top:10px;
        padding-bottom:10px;
    }
    .navbar-text {
        float:none;
        margin:15px 0;
    }


    .navbar-collapse.collapse.in {display:block !important}


    .collapsing {overflow:hidden !important}


    .navbar-nav .open .dropdown-menu {
        position:static;
        float:none;
        width:auto;
        margin-top:0;
        background-color:transparent;
        border:0;
        box-shadow:none;
    }


    .navbar-default .navbar-collapse {border:0}


    .navbar .navbar-nav {
        float:none;
        text-align:left;
        margin:0 0 10px;
        padding-top:15px;
        border-top:1px solid #e7e7e7 !important
    }
    .navbar .navbar-nav > li > a {
        padding:10px 15px;
        margin-left:0;
        margin-right:0;
    }


    .navbar .navbar-nav > li > a:after,
    .navbar .navbar-nav > li > a:hover:after {height:0 !important}


    .navbar .navbar-nav .open .dropdown-toggle {background-color:#eee !important}


    .navbar .navbar-nav .dropdown-menu {background-color:#f4f4f4}


    .navbar .navbar-nav .dropdown-menu li a {line-height:200%}


    .navbar .navbar-nav .dropdown-menu li.active a {background-color:transparent !important}


    .navbar .navbar-nav .dropdown-menu {
        left:auto;
        padding:5px 0;
        border:0;
        box-shadow:0 0 0 0;
    }
    .navbar .navbar-nav .dropdown-menu li a {
        font-size:14px;
        text-align:left;
        padding:5px 15px 5px 25px;
        color:#777;
    }
    .navbar .navbar-nav .dropdown-menu li a:hover,
    .navbar .navbar-nav .dropdown-menu li.active a {color:#333 !important}


    .navbar .navbar-nav .dropdown:hover .dropdown-menu {display:none}
    .navbar .navbar-nav .dropdown.open:hover > .dropdown-menu {display:block}


    .navbar .navbar-nav li:last-child .dropdown-menu {
        right:auto;
        left:auto;
    }
    .navbar .caret {display:inline-block}
}


@media screen and (min-width:768px) and (max-width:991px) {
    .navbar-toggle {margin-right:0}
}
Second step edit assets/js/main.js
line 60 max-width:767px -> 991px


line 67 min-width:768px -> 992px


line 301 max-width:767px -> 991px
That's it. Make sure to clear your cache and fresh.
Tested on our local dev :)
That's managed under the excerpt of the post. If there is no excerpt present then it will take from the first few words of the content in the content editor.

Happy to answer any questions.
If you have not imported yet, make sure to follow all the instructions to import the demo content along with the place holder images here: http://docs.themovation.com/bellevue/#democontent specifically the checkbox that says, "download and import file attachments" - make sure it's checked!
Still having issues? Try again...
You can import the demo content if you've missed the step or something went wrong after activation. The import is in your zip that you would have downloaded from ThemeForest. It should be under the /demo_content folder and the file is called Bellevue-demo-content.xml
If you go to Tools / Import / WordPress you should be able to import the pages and placeholder images again. You'll probably want to start the import process from a clean slate. Make sure that all posts and pages have been deleted and removed from your Trash tabs. If you have customized or add pages make sure not to delete your work or back it up.

also under posts and remove all content under Belleve. If you have made modifications then you'll want to back these up to try proceeding without deleting them.

Once this is cleaned up you should be able to import the demo again. It might not be perfect because the demo content is supposed to be installed on a new site but it should be helpful to you. :-)
If you see the Illegal offset error, go to Appearance / Theme Options / Top Navigation and save changes. No other action is required.
Default home page cannot be seen. You must create a translation in all languages in order to use it as a default Front page.
Menu is removed - Same as above, you must create a menu for both English and french in order for the default menu to show.
Quickest way to add a switcher is as a widget. Appearance / Widgets / Drag and drop the Language switcher into the primary sidebar.

There are also other settings as well here: https://polylang.wordpress.com/documentation/frequently-asked-questions/the-language-switcher/
Click on the + icon under All Pages / to create a translation or open the page you wish to translate for editing and click on the flag you wish to create a translation for.

or

This will create a new page, then you can choose a title, click inside the content editor and then click publish.

Once this is done, Polylang should copy over all meta boxes and content from the original translation of that page. If not you may need to move some content over manually.
You may notice that some content is missing, this is because you may need to create translations of those custom post types.
Example: The Explore page had three service blocks, What to do , what to see and where to eat. When I translate this page those service blocks won’t show in the French version until they are created and added to the correct group.
English Version live view:

English Version edit view (Service block meta box) Selected by Group ‘Explore - What to do’.

French Version live view

French Version edit view (Service block meta box) Selected by Group ‘Explore - What to do’.

To remedy - Go into Dashboard / Bellevue / Service Blocks and find those service blocks and translate them into the new language and also make sure they are part of the same group ‘Explore - What to do’. Use the plus symbol again.


French Version live view after adding the Service Block Translation.

The booking system hands off the number of nights to WooCommerce via add_to_cart shortcode but does not pass any other info to WooCommerce.
We’ve recently added support for passing Check and and Check out dates to WooCommerce and we’ve also provided 3 additional custom fields to be used in the future.
This code is available in the child theme that we have included but you may need to work with a developer or designer to enable this and to make this work to your needs.
The plugin is developed by another company and we have requested some big updates, they are currently working on them.
Some people have assed about the order status and if it updates automatically with WooCommerce. WooCommerce does not talk to the WP Booking System like this yet. The WP Booking System can set it to auto pending so that no one else can book those days once the request is made, then Woo takes over for payment. Once the payment has been made and confirmed someone will need to go in and confirm payment then set the auto pending status to ‘Booked’. Currently that’s how it works.
We’ve requested some updates from the developer and this is something we would like to see too. I’ll be putting a request in.
Although the testimonials do not include a star rating you can certainly use the built in Glyphicons to make a star rating. Here is an example of what you would add to the Quote area.
<span class="glyphicons glyphicons-star"></span><span class="glyphicons glyphicons-star"></span><span class="glyphicons glyphicons-star"></span><span class="glyphicons glyphicons-star"></span><span class="glyphicons glyphicons-star"></span>
There are also many plugins that can provide you with advance testimonial quote bubbles.
That explains how to you add an add to cart button to the booking form.
Here are the steps:
1) Follow this guide to set it up: Add WooCommerce to a booking calendar
2) Once #1 is complete, when someone fills out a booking form an 'Add to cart' button will appear, along with a message you can customize. "to complete your reservation, please add your room to the cart and checkout".
This custom message can be edited, under WP Booking System / Forms / Edit / Translations / 'Thank you Message'.
You can also change the text of the 'Add to cart' button, see here: Change WooCommerce Add to Cart button text.
2) Once they click on 'Add to Cart' button, the view cart button will appear.
You can also skip this step and have the add to cart button go directly to the checkout page, see here: Skip Cart Go Straight to Checkout Page in WooCommerce
3) Once on the cart or checkout pages, the visitor processes their order as they would any other eCommerce site and their payment is accepted.
WooCommerce will keep a separate order from the Booking System. Once the payment has been completed you will need to manually update your calendar from pending to booked or whatever your setting are that need to be updated.
Currently there is no communication between WooCommerce and WP Booking System after the reservation has been made and the customer starts the checkout process. We've explained in more detail here: https://themovation.ticksy.com/article/7980/
Here are some additional article that may be of help to you:
Login into your WordPress admin panel and go to “Appearance” -> “Themes”. Here are listed all your installed themes. Click on desired theme and pop-up window will appear. On the right-side, near theme name is displayed theme version. This method works both for active and inactive themes.
Custom CSS:
.video-container {
    position: relative;
    padding-bottom: 56.25%;
    padding-top: 30px;
    height: 0;
    overflow: hidden;
}

.video-container iframe,
.video-container object,
.video-container embed {
    position: absolute;
    top: 0;
    left: 0;
    width: 100%;
    height: 100%;
}

.entry-content img,
.entry-content iframe,
.entry-content object,
.entry-content embed {
        max-width: 100%;
}
Custom DIV
<div class="video-container">
<iframe width="1280" height="720" src="paste your yourtube link here" frameborder="0" allowfullscreen></iframe>
</div>
Cheers!
You can update the WP Booking System Plugin without updating the Bellevue theme, although we recommend always using the most recent version of the theme and plugins.
* Always make a full database backup of you website before performing any updates.
To find out how to update the theme please see: https://themovation.ticksy.com/article/3825/
To update the plugin only without updating the entire theme:
You should be using the most recent version of WP Booking System which is version 3.4.2 at the time of writing this article dated September 21, 2016.
If you have any question you can always contact support and create a ticket here: https://themovation.ticksy.com/
Happy to assist.
If you've install the child theme you'll see that the functions.php file is already there..
You can use cpanel or ftp to edit your functions.php file. The foot scrip function is already there.
1) Just uncomment the
//add_action( 'wp_footer', 'my_themo_footer_scripts' );
becomes
add_action( 'wp_footer', 'my_themo_footer_scripts' );

Then you'll want to replace the <script> tags with your code.
So remove :
<script type="text/javascript">
        /* Disable slider_gallery lightbox  */
        jQuery(document).ready(function($) {
            "use strict";
            console.log('My Footer Script');
        });
    </script>
###p
That should be it.
Make sure your child theme is activate. You can install and activate it just like installing a new theme. The zip will be in your zip you download form themeforest. Look for bellevue-child.zip

Cheers!
Big thank you to Mario for posting his guide. He took the time to share his solution for other to use. Thank you!!
You'll need to have the Yoast SEO plugin installed Make sure you have the Child Theme installed and copy the bellevue/templates/page-header-rooms.php to your Child Theme into the templates folder
Then on your dashboard, Apperance>>Editor -- Make sure you select the Bellevue Child Theme and edit page-header-rooms.php around line 210 Find
<?php
 //-----------------------------------------------------
 // GET BORDER CLOSE
//-----------------------------------------------------
Type this code BEFORE it
<?php if ( function_exists('yoast_breadcrumb') )
{yoast_breadcrumb('<p id="breadcrumbs">','</p>');} ?>
On your dashboard, Apperance>>Theme Options in your custom CSS add this to display the breadcrumbs on the right side instead of the default left side. If you're happy with displaying breadcrums on left side, than ignore this step.
#breadcrumbs {float: right; margin-right: 200px;}
If you want to remove the breadcrumbs from devices with screens smaller then 767px (mobile devices)
@media only screen and (max-width: 767px)
{#breadcrumbs {display: none !important;} }
To have the breadcrumbs on all your other pages except the Home (front) page Make sure you have the Child Theme installed and copy the bellevue/templates/page-header-rooms.php to your Child Theme into the templates folder
On your dashboard, Apperance>>Editor -- Make sure you select the Bellevue Child Theme and edit page-header.php at the very end add this code
<?php if (is_front_page()) {
            echo '';
} else {
if ( function_exists('yoast_breadcrumb') ) {
     yoast_breadcrumb('<p id="breadcrumbs">','</p>');
}
} ?>
If you ALSO want to show the Breadcrumbs on the Home page then just use this code instead
<?php if ( function_exists('yoast_breadcrumb') )
{yoast_breadcrumb('<p id="breadcrumbs">','</p>');} ?>The best way to update the add_image_size is to do it in a child theme functions file so you don't edit any core files.
I found an article on that here: http://wordpress.stackexchange.com/questions/74934/remove-or-update-add-image-size
So something perhaps like this on your child theme functions file.
function child_theme_setup() {
add_image_size( 'blog_image', 668, 180, true ); //(cropped)
}
add_action( 'after_setup_theme', 'child_theme_setup', 11 );
Here are all the image sizes used:
themo_full_width
themo_full_width
themo_thumb_slider
themo_thumb_slider_portrait
themo_brands
themo_mini_brands
themo_testimonials
themo_featured
themo_team
themo_showcase
themo_page_header
themo_blog_standard
themo_blog_masonry
themo_rooms_standard
Once that is done you will need to reupload or you can use a plugin like https://en-ca.wordpress.org/plugins/regenerate-thumbnails/ to regen the thumbnail sizes.
I hope that helps you.
In December 2017 we launched the largest update ever for our Bellevue theme that includes a long list of new features and improvements, the most important one being a brand new visual drag and drop builder.
Our original meta box page builder system worked very well, but now that Bellevue had been available for 3 years a lot changed and the new system is a great improvement.
We wanted to deliver the best possible experience and didn't want to compromise on the features of the new version so it is a full rebuild, and as such there isn't a simple upgrade option from v1 to v2/v3. It's essentially a new theme. So for all existing customers, you have the option to continue to use v1, or included for free - you can install v2/v3 as a new theme and recreate your content in the new system.
If you choose to upgrade to v2/v3, we strongly recommend making a backup, though we don't expect any issues to arise.
Download the latest theme from your ThemeForest downloads page, https://themeforest.net/downloads
Upload the theme zip to your website and activate.
You may see a notice when trying to activate the new theme.

There is a safety switch, which you can turn off.
define( 'TH_PREVENT_BELLEVUE_UPGRADE', true );
to
define( 'TH_PREVENT_BELLEVUE_UPGRADE', false );
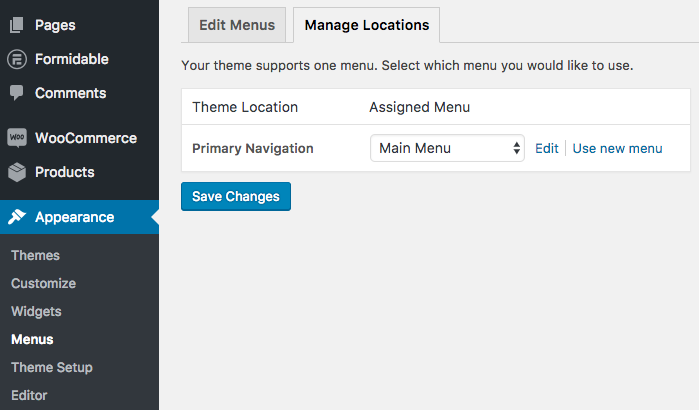
Once you have used the new installer (as seen here), you may need to set your active menu and homepage.
That's it!
You should see a page like: https://cl.ly/3w3M152x1N0X
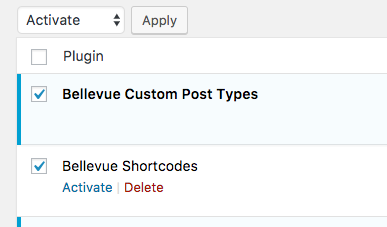
You may want access to your old content but since we no longer use the old metabox builder you won't have access as these plugins have been disabled. You can reactivate the old theme to get access to your old content at anytime. Just activate Bellevue version 1, and you will also need or reactivate a few plugins:
404 Error - If you see a 404 error trying to access your old Room, try going to Settings / permalinks / and click save to reset the permalink structure. You may need to do the same step when reactivating the new version of Bellevue.
Switch back to the new version when you are ready.
There is separate documentation for the new version which is available here: http://themovation.helpscoutdocs.com
If you have any questions, please feel free to open a ticket here on the support system: https://themovation.ticksy.com/
Please make sure you know which version of Bellevue you are currently using before continuing. Not sure?
The most recent version of Bellevue 1 is Version 1.9.4 and you can download it here.
Once you have downloaded the zip from the link above, you can continue.
Still not sure? Please open a ticket and we will be happy to assist.
Notes:
Files Updated:
Notes:
Files Updated:
Notes:
Files Updated:
Notes:
Files Updated:
Notes:
Files Updated:
Notes:
Files Updated:
Notes:
Files Updated:
Notes:
Files Updated:
Notes:
Files Updated:
Notes:
Files Updated:
Notes:
Files Updated:
Notes:
Files Updated:
Bug Fixes
Files Updated:
Updated all plugins
+ bellevue-custom-post-types,zip (new version)
+ bellevue-shortcodes.zip (new version)
+ masterslider.zip (new version)
+ meta-box.zip (new version)
+ meta-box.zip (new version)
+ wp-booking-system.zip (new version)
+ style.cs (Version bump)
+ lib/custom.php (bug fixes)
+ assets/js/main.js (bug fixes)
+ templates/meta-testimonials.php (bug fixes)
+ lang/bellevue.pot (added)
+ templates/meta-slider-flex.php
Added Target attribute on the button shortocde.
+ lang/bellevue_en.mo
+ lang/bellevue_en.po
Update localization to support plugins and option tree
+ lib/titles.php
Typo causing error. esc_html__ on line 33 was duplicated
+ assets/js/main.js
Adding support for external links to angular sites.
+ lib/custom.php
Master Slider Version Bump
+ assets/js/main.js
+ assets/js/vendor/vendor_footer.js
Correct bug / lightbox reversed order via prev / next
+ style.css
Version bump
File: assets/js/vendor/vendor_footer.js
Note: Correct bug / lightbox reversed order via prev / next
File: lib/custom.php
Note: Bellevue Shortcode Plugin - Update 1.2.4 - Support for pre / next inside lightbox for slider_gallery
File: plugins/bellevue-shortcodes.zip
Note: Bellevue Shortcode Plugin - Update 1.2.4 - Support for pre / next inside lightbox for slider_gallery
File: register-meta-boxes.php
Note: Fixed missing service block custom post types from showing inside the select individually service block split metabox.
File: style.css
Note: Version bump
Initial Release
You can find out quickly and easily.
Example for Bellevue Version 1
Example for Bellevue Version 2
From WP Dash / Appearance / Themes / you can click on the Bellevue theme and notice the version number.
Once you know your version, please use the following links to get the latest theme files.
Please see: Migrating from Bellevue v1 to Bellevue v2
We have a new knowledge base to answer any questions that you have about the theme:
http://themovation.helpscoutdocs.com/
If you have any questions not answered in the knowledge base, please feel free to open a ticket here on Ticksy.